TANGLEY CALLIOPE RESTORATION PROJECT (part 17)
by Dr. Bill BlackTHE CALLIOPE WINDCHEST
Next we will disassemble the calliope windchest. Unlike the Wurlitzer organ which used wood for construction of the windchest, the Tangley Calliope windchest is constructed with fairly heavy sheet metal and soldered together.
In PHOTO A, the windchest has been removed from the machine and is shown, face down on the workbench. Note the two large pressure inlet tubes to supply the wind pressure to the chest.
In PHOTO B, the windchest is in an upright position, sitting on some cans to raise it up for clearance for the pressure inlet tubes and the workbench. The outlets for the tubing going to the pipework consists of elbows positioned over holes in the top of the windchest. These elbows are soldered in position over the holes. Also note the square plate covering a large hole in the front of the windchest. Removal of this plate allows access to the inside of the windchest to be able to remove the valve to service the valve facings if necessary.
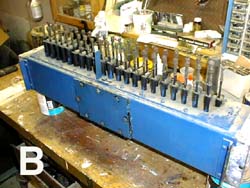
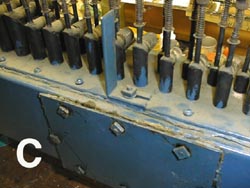
PHOTO C shows a closer view of this arrangement. On the top of each elbow is a piece of tubing soldered in an upright position over another hole on the top of the elbow. Through this tubing, a push rod is placed. On the bottom of the rod inside the windchest is a metal disc, faced with rubber. On the upper end of the rod is a spring arrangement which holds the rod in an upper position causing the lower disc to be held against a seat in the underside of the top. This provides a seal and prevents wind from flowing through the elbow. When the push rod is depressed, the valve disc is moved down and off the seat and wind flows into the elbow and to the pipework.
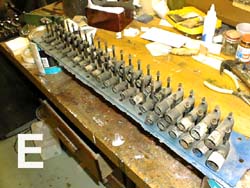
In PHOTO D, we have removed the front access plate and the top of the windchest. The top plate which has the elbow arrangement is bolted on and has some material which looks like tar paper for a gasket. This same material was used for the front access plate. The windchest has several different coats and different colors of paint on it from previous touch-ups. The old paint and the gasket material will be stripped off and the inside cleaned in preparation for a fresh coat of paint. The front access plate is held on with bolts. The bolt heads are soldered to the inside of the chest with the threaded end facing outward so nuts can be screwed on to retain the plate. Several of these are broken loose and will be resoldered in place.

PHOTO E shows the top of the windchest removed. The elbows are all soldered to this top plate and the whole elbow and push rod unit can be removed in one piece. Note there are a variety of different size elbows, the larger diameter elbows will be connected to this size diameter hose to provide more air flow to the larger pipes. The smaller pipes wonąt need as much to speak and so smaller diameter elbow and hose can be used. Next month we will install the new valve facings and reassemble the windchest.
Dr. Bill Black is one of the nation's most knowledgeble Wurlitzer band organ experts. He has made recordings of many band organs and other mechanical music machines which are available for purchase in our CarouselStores.com website.