TANGLEY CALLIOPE RESTORATION PROJECT (part 18)
by Dr. Bill BlackFINISHING THE CALLIOPE WINDCHEST
Last month we disassembled the calliope windchest. Next we will clean up the parts, make repairs and reassemble it.
In PHOTO A, we have stripped the old paint, and resoldered any broken solder joints. Several of the pushrod tubes on top of the elbows had broken solder joints. Several were also bent over a bit. These were straightened so they would have a good alignment with the keyboard. We will use a cork strip for the gasket between the body of the windchest and the top.
PHOTO B shows the windchest partially reassembled so it can be painted. We used a gray automotive primer which give us a nice flat gray appearance.
The windchest pushrods are removed by taking the leather nuts and the spring off the top end of the rod. The rod then drops down and can be removed. On the bottom end of the rod is a head which resembles the head of a nail. The difference is that the head has tapered sides on it which allows the valve backing a bit of a wobble. This allows for a nice tight seat since the backing is free to adjust itself to the upper seat. The rest of the valve consists of a metal backing, a facing, a washer and a small collar. This collar is soldered on the rod to hold the valve together. In PHOTO C, the small collar has been unsoldered from the rod and moved up the rod for the picture (the arrow points to the collar).
Removing the collar allows the washer and the facing to be removed. A soldering iron is used to melt the solder and slide the collar up before the solder hardens. Valve facings were punched from a new piece of a rubber tractor tire inner tube. These facings were glued to the backings.
The rod is cleaned up, the backing with the new facing is slid onto the rod along with the retaining washer. The small collar is then slid into position against the washer, facing and backing. The collar is then resoldered in place.
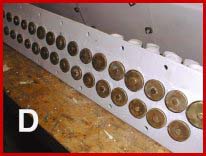
PHOTO D shows the underside of the windchest top. The pushrods with the valves have been installed in the pushrod tubes. There are several different sizes in regard to the diameter of the valve backing and facings. The smaller ones serve the smaller pipes and the larger ones serve the larger pipes as these require a greater air flow to make the pipe speak properly.
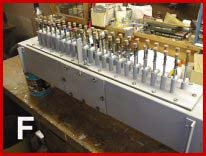
PHOTO E shows the valve pushrod assemblies reinstalled in the windchest and the windchest top bolted on. On top of the tube which holds the pushrod, there is a washer soldered in position slightly below the top to retain a spring from sliding down the tube. The top end of the rod is threaded. Leather nuts are threaded on the rod to retain the upper end of the spring. The top leather nut contacts the bottom of the keyboard key.
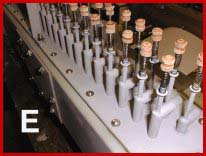
When the rod is depressed by the key, the valve is opened in the windchest and the air is allowed to flow to the pipe. When the key is released, the spring forces the pushrod and valve up into the closed position and air to the pipe is stopped.
Dr. Bill Black is one of the nation's most knowledgeble Wurlitzer band organ experts. He has made recordings of many band organs and other mechanical music machines which are available for purchase in our CarouselStores.com website.