TANGLEY CALLIOPE RESTORATION PROJECT (part 31)
by Dr. Bill BlackTUBING THE PIPEWORK TO THE WINDCHEST...continued
Having done some preparation work last month, we are now ready to install the tubing connecting the windchest nipples to the top nipples for the pipework.
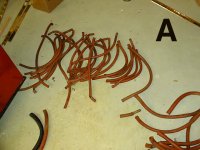
PHOTO A shows the old rubber tubing which was removed during the disassembly of the calliope. The late Mike Kitner had advised me to preserve the tubing to be used again if possible because the availability of thin wall rubber hose of the correct diameter was limited and would be very hard to find. When the hoses were removed they were numbered according to the corresponding pipe number. They proved to be in pretty good shape with the exception of one of the larger hoses being split. Some of the hoses included elbows in the case where there was a sharp turn in the hose required to attach to the top nipple.
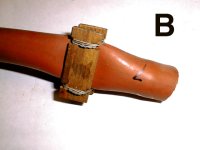
One of the interesting things about old music machines, you sometimes find curious repair jobs. PHOTO B shows an interesting repair. Suppose you are on the road with your calliope playing a job and suddenly you have a pesky pipe that plays all the time. What to do? The operator finds the hose supplying air to that pesky pipe, uses two pieces of wood with some notches, clamps it onto the hose with some wire which collapses the hose and chokes off the air supply to the pipe. Problem solved, but of course that pipe no longer plays.
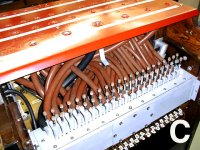
In PHOTO C we have cleaned the old hose. Using the numbers on the wind chest nipples, the numbers which I put on the hose during the disassembly and the numbers on the nipples on the top, the windchest is tubed to the pipework. This proved to be a challenge since the old hose had a memory in regard to its shape and you had to figure out which hose went over top or under the other hoses. In some cases the old hose was a loose fit on the nipple due to hose size being a bit larger than the nipple. To overcome this, friction tape was wrapped around the nipple to shim it up. Shellac was applied to the nipples before the hose is slipped on. This serves to fasten the hose to the nipple and prevents the hose from blowing off the nipple when air pressure is applied to it to blow the pipe. One of the larger hoses was in bad shape so it was replaced with a piece of black hose. PHOTO C shows the view from the keyboard side of the calliope.
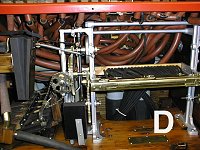
PHOTO D shows the view of the tubing from the roll frame side. You can see the use of the elbows in the hoses to deal with some sharp turns. Also, this mass of hoses really fills the area under the top of the calliope.
PHOTO E shows why thin wall tubing (hose) is necessary. There is little clearance between the hose and some of the windchest pushrods when the hose is on the nipple. Thick wall tubing just wonąt fit. Excessive pressure on the metal tube housing for the pushrod tends to break the solder joint and allows the pushrod to move out of position and become misaligned with the key on the keyboard.
Dr. Bill Black is one of the nation's most knowledgeble Wurlitzer band organ experts. He has made recordings of many band organs and other mechanical music machines which are available for purchase on our CarouselStoers.com website.