TANGLEY CALLIOPE RESTORATION PROJECT (part 32)
by Dr. Bill Black
RESTORING THE KEYBOARD
PHOTO A shows the unrestored keyboard in the calliope before the
restoration of the machine was begun. The original key coverings had been
removed and replaced with formica coverings. In the process, the keys had
been sanded making them a bit smaller than they had been previously.
PHOTO B shows a front view of the keyboard and the linkage rods to the
stack linkage.
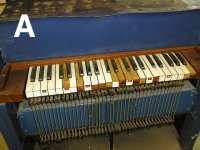 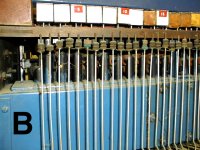
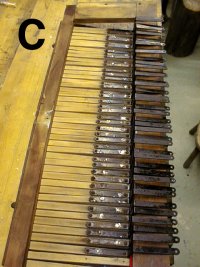
PHOTO C shows the underside of the keyboard after removal from the
machine. The metal fingers are attached to each key to provide a
connection to the stack linkage.
The keyboard restoration was done by the late Mike Kitner before he
passed away. The calliope restoration is a project which was in progress
a year or two before he passed away.
Examination of the keyboard after removal from the machine showed the
tail ends of the keys were worn in addition to the results of the sanding
and recovering problem. Mike thought that the original keys were not
worth recovering. Mike also reasoned that Tangley had not made the keys
but had purchased them from another source, perhaps a piano company which
made keys for their pianos.
He wondered what the size of the keys on an old pump organ would be. A
mutual friend had such an organ which was only good for parts. The
keyboard was obtained for comparison. In a stroke of good luck, they were
almost exactly the same size, close enough that they could be made to
fit. Plus, the key coverings were in very good shape. The bed frame was
much longer of course since the pump organ had a larger scale.
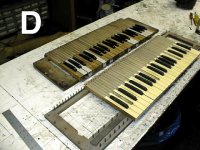
PHOTO D shows the old keyboard (in the back) and the pump organ keyboard
in the front with the appropriate keys which will be used. The angle of
the photo makes the keys on the front bed look much longer but they are
actually all most identical in size. The other difference in the two
keybeds is the location of the pins which mount the keys and hold them in
alignment.
In order to deal with this difference, the pump organ keybed was cut off
on each end and new ends made to the same configuration as the original
keybed. In PHOTO E you can see the new ends of the keybed being glued in
position. This will give us a keybed of the same physical proportions as
the original and permit the use of the pump organ keys using their rail
and pin arrangement .
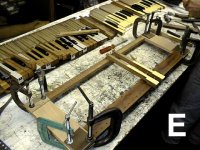 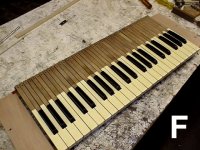
PHOTO F shows the completed keyboard. The black keys were lacquered and
the white keys cleaned. The keyboard arrangement is now the same size as
the original and looks great!
 Dr. Bill Black is one of the nation's most knowledgeble Wurlitzer band organ experts. He has made recordings of many band organs and other mechanical music machines which are available for purchase in our Gift Shop . Dr. Bill Black is one of the nation's most knowledgeble Wurlitzer band organ experts. He has made recordings of many band organs and other mechanical music machines which are available for purchase in our Gift Shop .
|