TANGLEY CALLIOPE RESTORATION PROJECT (part 33)
by Dr. Bill Black
INSTALLING THE KEYBOARD
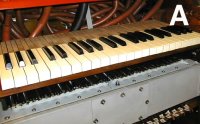
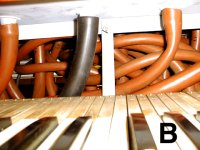
Now that we have the keyboard repaired, we can install it in the calliope. PHOTO A shows the keyboard mounted on the wooden cleats attached to the side of the machine. In addition to being fastened to the sides of the machine there are also two supports in the center of the keyboard. One bracket is mounted on the back of the keyboard and is attached to the cross brace under the top of the machine. This bracket may can be seen in PHOTO B.
 
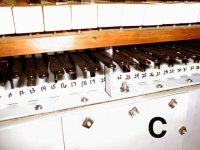
In PHOTO C we can see the center brace in the front which is attached to the top of the windchest. The metal fingers mounted to the underside of each key can also been seen in PHOTO C. Keep in mind that the pushrods on the windchest contact the underside of the keys so that when the key is depressed, the push rod on the stack is depressed directly. The metal fingers will serve as a linkage from the keys to the pneumatic stack. One of the metal rods which serves as the connection to the intermediate linkage between the keys and the stack was a replacement but the wrong diameter. We made a new rod of the correct diameter, using an original as a pattern and threading the end of the rod with a die. PHOTO D
 
In PHOTO E, we have attached these rods to the metal fingers on the
underside of the keys and to the intermediate linkage to the stack. I
thought it might be a good idea to use leather nuts on each side of the
metal fingers to prevent any lost motion when the machine is in
operation. After completing this and examining how this would work, I
realized I had made a mistake. That would work when the machine was
playing from the music roll as the rod is being pulled in a downward
direction. This was not going to work when the machine was being played
by hand. In the case of the hand playing, the rod is now being pushed in a downward direction by the key, putting the pressure on the small metal wire which holds the rod in the wooden finger slot. Eventually, this would cause the wire to fail and the metal rod would no longer be
retained in position in the wooden finger. The result would be that the
linkage between the stack and the windchest would be disconnected when
the rod came out of the slot in the wooden finger.
 
So, I went back and examined the photos taken before and during the
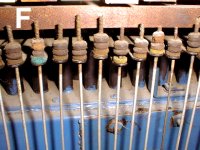
disassembly of the machine. In PHOTO F, we can see the correct
arrangement of the leather nuts on the rods. Note there is no nut on the underside of the metal finger from the key. In this arrangement, when the key is depressed, the metal finger slides down the rod and the linkage to the stack does not move. So, the linkage is only in operation when the machine plays from the music roll. During the hand play mode, the keys are not functionally connected to the linkage.
I went back and removed the leather nut from under each finger and now we are correct.
 Dr. Bill Black is one of the nation's most knowledgeble Wurlitzer band organ experts. He has made recordings of many band organs and other mechanical music machines which are available for purchase in our Gift Shop . Dr. Bill Black is one of the nation's most knowledgeble Wurlitzer band organ experts. He has made recordings of many band organs and other mechanical music machines which are available for purchase in our Gift Shop .
|