by Howard Wyman
Building the Piccolo Pipes
 After completing the flageolet rank, I decided to tackle the piccolos.
In the Wurlitzer 104/105 plans that I am using the specifications are
shown for brass piccolo pipes. A little research revealed that the early
models of this organ had brass piccolos but the later models had wooden
piccolos. In the early model which had a cabinet made of varnished oak
the front was open and the piccolos could be seen, however in the late
model which had a painted cabinet with more ornamentation the pipes were
hidden behind a screen with a landscape painted on it. This cleared up a
question for me. Thinking that both models used the brass piccolos, I
could not understand how the screen could be put in front of the pipes.
The bases of the brass piccolos project forward slightly past the front
of the cabinet and would interfere with the painted screen. However, by
using wooden piccolos the flatter fronts of the pipes would allow room
for the screen. I learned about this while trying to decide which style
of cabinet I wanted to use, oak or painted. One thing that I was sure
of, I wanted the front to have an opening through which some of the pipes
could be seen and the brass piccolos would look very good in that
location.
After completing the flageolet rank, I decided to tackle the piccolos.
In the Wurlitzer 104/105 plans that I am using the specifications are
shown for brass piccolo pipes. A little research revealed that the early
models of this organ had brass piccolos but the later models had wooden
piccolos. In the early model which had a cabinet made of varnished oak
the front was open and the piccolos could be seen, however in the late
model which had a painted cabinet with more ornamentation the pipes were
hidden behind a screen with a landscape painted on it. This cleared up a
question for me. Thinking that both models used the brass piccolos, I
could not understand how the screen could be put in front of the pipes.
The bases of the brass piccolos project forward slightly past the front
of the cabinet and would interfere with the painted screen. However, by
using wooden piccolos the flatter fronts of the pipes would allow room
for the screen. I learned about this while trying to decide which style
of cabinet I wanted to use, oak or painted. One thing that I was sure
of, I wanted the front to have an opening through which some of the pipes
could be seen and the brass piccolos would look very good in that
location.
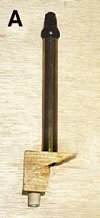
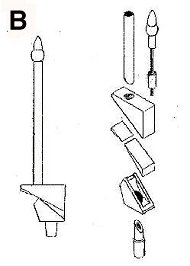 A side view of one of the piccolo pipes is shown in PHOTO A. It is
transversely-blown in a manner similar to an orchestral flute or piccolo.
The air enters the opening in the foot and flows through a slit which
directs it across the open bottom of the brass tube, much like when one
blows across the top of a bottle. An exploded view is shown in PHOTO B.
A side view of one of the piccolo pipes is shown in PHOTO A. It is
transversely-blown in a manner similar to an orchestral flute or piccolo.
The air enters the opening in the foot and flows through a slit which
directs it across the open bottom of the brass tube, much like when one
blows across the top of a bottle. An exploded view is shown in PHOTO B.
 Several diameters of tubing are required, the largest diameter being used
for the pipe with the lowest pitch. I tried to find the tubing locally,
but the only supplier I found only sold ten foot lengths. Finally, I
found a couple of catalog firms which would sell the tubing in 12 inch
and 36 inch lengths. If anyone would like the names of these suppliers
send me an e-mail and I will reply with the information. In at least one
case, the diameter specified in the plans was not available, but a size
very close to it was. I figured that the slight difference would not be
a problem.
Several diameters of tubing are required, the largest diameter being used
for the pipe with the lowest pitch. I tried to find the tubing locally,
but the only supplier I found only sold ten foot lengths. Finally, I
found a couple of catalog firms which would sell the tubing in 12 inch
and 36 inch lengths. If anyone would like the names of these suppliers
send me an e-mail and I will reply with the information. In at least one
case, the diameter specified in the plans was not available, but a size
very close to it was. I figured that the slight difference would not be
a problem.
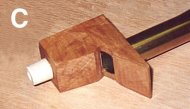
 For the wooden base, I used maple. A view of the base can be seen in
PHOTO C. There are some interesting angles involved and I first
envisioned cutting long strips with the proper angles and then sawing
them to width. This would work since all of the bases have the same
dimensions other than the width as viewed from the front of the organ.
However, the method that ultimately worked the best for me was to cut a
block of wood of the proper width for a particular pipe and large enough
for all the pieces of the base. I then laid out the dimensions on the
side of the block allowing space for the saw blade cut between the pieces
of the base. The band saw I used only makes about a 1/32 inch cut.
After cutting the pieces apart on the band saw only a light sanding was
required to make the pieces fit together snugly. The next step was to
drill the hole in the bottom for the pipe foot and then drill the hole in
the top piece for the brass tube. I then placed the tube through the
hole and carefully sawed it off even with the bottom of the hole so that
the angle of the bottom of the tube matched that of the wooden piece.
Using a small drill, I drilled a hole through the longer side of the tube
into the wood and then drove in a small brass nail to hold the tube in
place.
For the wooden base, I used maple. A view of the base can be seen in
PHOTO C. There are some interesting angles involved and I first
envisioned cutting long strips with the proper angles and then sawing
them to width. This would work since all of the bases have the same
dimensions other than the width as viewed from the front of the organ.
However, the method that ultimately worked the best for me was to cut a
block of wood of the proper width for a particular pipe and large enough
for all the pieces of the base. I then laid out the dimensions on the
side of the block allowing space for the saw blade cut between the pieces
of the base. The band saw I used only makes about a 1/32 inch cut.
After cutting the pieces apart on the band saw only a light sanding was
required to make the pieces fit together snugly. The next step was to
drill the hole in the bottom for the pipe foot and then drill the hole in
the top piece for the brass tube. I then placed the tube through the
hole and carefully sawed it off even with the bottom of the hole so that
the angle of the bottom of the tube matched that of the wooden piece.
Using a small drill, I drilled a hole through the longer side of the tube
into the wood and then drove in a small brass nail to hold the tube in
place.
The next step was to file the slit or windway into the upper edge of the bottom piece. For this task I made up several narrow strips of wood with various grades of sandpaper glued on. It is necessary to file a while, then place the wedge which fits on the top of this piece in place and while holding them together use a feeler gauge to measure the depth of the slit. This procedure is repeated until the correct depth is reached.
 The piccolo is a stopped pipe. The stopper is a wooden cylinder covered
with soft leather which is sized to fit snugly into the brass tube, PHOTO
D. The pipe is tuned to proper pitch by sliding this plug up or down
inside the tube. An ornamental wooden piece, frequently called an acorn
fits into the top of the tube. A shoulder on the acorn sits on the upper
edge of the tube. Fixed into this acorn is a threaded rod which extends
down into the tube. The leather covered plug has a threaded hole through
its center which screws onto this threaded rod. By rotating the acorn
one way or the other, the plug is moved up or down in the tube causing
the pitch to drop or rise. I used a small lathe to turn the acorns,
making all of the dimensions smaller as the diameter of the various pipes
decreased.
The piccolo is a stopped pipe. The stopper is a wooden cylinder covered
with soft leather which is sized to fit snugly into the brass tube, PHOTO
D. The pipe is tuned to proper pitch by sliding this plug up or down
inside the tube. An ornamental wooden piece, frequently called an acorn
fits into the top of the tube. A shoulder on the acorn sits on the upper
edge of the tube. Fixed into this acorn is a threaded rod which extends
down into the tube. The leather covered plug has a threaded hole through
its center which screws onto this threaded rod. By rotating the acorn
one way or the other, the plug is moved up or down in the tube causing
the pitch to drop or rise. I used a small lathe to turn the acorns,
making all of the dimensions smaller as the diameter of the various pipes
decreased.
After assembling all of these parts, the final step is to attach the thin piece of wood which fits up under the front of the top piece, the rear edge of which partially covers the opening in the bottom of the tube. I placed the pipe in the windchest and with the pressure adjusted to the correct reading I slid this thin piece slightly forward and back until I obtained a good solid clear tone from the pipe. I marked this location and then glued the piece on. Then I tested the pipe again to make sure I had it in the right place.
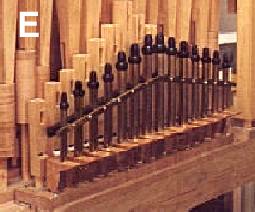
PHOTO E shows the piccolos in place on the windchest with the flageolets directly behind them.
Editors note: Howard is a retired electrical engineer and lives in Florida. Most of his career was at the Army Night Vision and Electro-Optics Laboratory. He became involved in mechanical music with the purchase of a non-working player piano. As you will see in his articles, Howard is a highly skilled craftsman. Building your own band organ is a real accomplishment and Howard does beautiful work. Howard can be contacted at: hwyman@tampabay.rr.com