by Howard Wyman
BUILDING THE TRUMPET PIPES
 The Wurlitzer 105 band organ has a rank of 13 trumpet pipes. Some of the
other styles of Wurlitzer band organs used brass trumpets but in the case
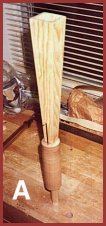
of the style 105 the trumpets are made of wood. PHOTO A shows a
completed trumpet. At times the trumpets play the melody along with the
other melody pipes and at other times the trumpets play a countermelody.
They can also at times carry the melody. The sound is produced by a
brass reed assembly. This consists of a brass tube or shallot which is
closed at one end and an opening is cut in the side. A thin strip of
brass, or tongue, covers the opening in the shallot. This assembly is
housed in a larger wooden cylinder known as the boot. Air from the wind
chest enters the boot at the lower end through a foot which fits into a
hole in the wind chest. A stopper, known as a block, fits tightly into
the upper end. In some cases this block was made of lead, but in my case
I used wood. Two holes are drilled through the block. The open end of
the brass shallot fits into the underside of the larger of the two holes.
The Wurlitzer 105 band organ has a rank of 13 trumpet pipes. Some of the
other styles of Wurlitzer band organs used brass trumpets but in the case
of the style 105 the trumpets are made of wood. PHOTO A shows a
completed trumpet. At times the trumpets play the melody along with the
other melody pipes and at other times the trumpets play a countermelody.
They can also at times carry the melody. The sound is produced by a
brass reed assembly. This consists of a brass tube or shallot which is
closed at one end and an opening is cut in the side. A thin strip of
brass, or tongue, covers the opening in the shallot. This assembly is
housed in a larger wooden cylinder known as the boot. Air from the wind
chest enters the boot at the lower end through a foot which fits into a
hole in the wind chest. A stopper, known as a block, fits tightly into
the upper end. In some cases this block was made of lead, but in my case
I used wood. Two holes are drilled through the block. The open end of
the brass shallot fits into the underside of the larger of the two holes.
 The shallot and tongue are held in the block by means of a small wooden
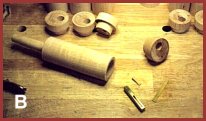
wedge, but the lower end of the tongue is free to vibrate. In PHOTO B
the brass shallot can be seen at the lower center. The tongue is to the
right of the shallot and the wooden wedge can be seen between the tongue
and shallot. At the left is the boot with pipe foot and in the upper
right is the block. Additional blocks can be seen at the top of the
photograph. A tuning wire passes through the smaller hole in the block.
The lower end of the tuning wire is bent up at an acute angle so that
presses on the tongue. Raising and lowering the wire changes the length
of the tongue which is free to vibrate permitting tuning to the desired
pitch. A resonator fits tightly into the upper end of the larger hole in
the block above the shallot. In Photo A the resonator is the tapered
portion at the top. In PHOTO A one can also see the cylindrical boot and
at the bottom the foot which fits into the wind chest. The tuning wire
can be see protruding from the top of the boot in front of the resonator.
PHOTO C shows the shallot and tongue installed in the block and held in
place by the wooden wedge. In this photograph one can visualize how the
length of the free portion of the tongue is adjusted by sliding the
tuning wire up or down.
The shallot and tongue are held in the block by means of a small wooden
wedge, but the lower end of the tongue is free to vibrate. In PHOTO B
the brass shallot can be seen at the lower center. The tongue is to the
right of the shallot and the wooden wedge can be seen between the tongue
and shallot. At the left is the boot with pipe foot and in the upper
right is the block. Additional blocks can be seen at the top of the
photograph. A tuning wire passes through the smaller hole in the block.
The lower end of the tuning wire is bent up at an acute angle so that
presses on the tongue. Raising and lowering the wire changes the length
of the tongue which is free to vibrate permitting tuning to the desired
pitch. A resonator fits tightly into the upper end of the larger hole in
the block above the shallot. In Photo A the resonator is the tapered
portion at the top. In PHOTO A one can also see the cylindrical boot and
at the bottom the foot which fits into the wind chest. The tuning wire
can be see protruding from the top of the boot in front of the resonator.
PHOTO C shows the shallot and tongue installed in the block and held in
place by the wooden wedge. In this photograph one can visualize how the
length of the free portion of the tongue is adjusted by sliding the
tuning wire up or down.
The tongue is curved slightly away from the opening in the shallot. When air enters the boot the flow of air causes the tongue to vibrate against the shallot and sets the column of air in the resonator into sympathetic vibration. The resonator amplifies certain parts of the sound and helps to make the note more audible and give it its characteristic timbre.
 If the builder is a fairly skilled metal worker he could make his own
shallots and tongues. The dimensions originally used by Wurlitzer are
given in the plans. However, since I consider myself more of a wood
worker than metal worker I opted to purchase them from a company which
supplies materials and parts for the organ industry. They also furnished
the tuning wires. These have the hook formed at the end which fits
against the tongue and are straight at the other end. After the wire is
inserted up through the hole in the block a 90 degree bend is put into
the upper end to give the person tuning the pipe something to grip. The
shallots should be polished before installing. This was done by placing
a sheet of very fine sandpaper on a smooth surface such as a drill press
table and rubbing the flat area on the side of the shallot with the
opening until it is smooth and shiny. The tongues as furnished by the
supplier are perfectly flat and so must be given a slight curve. One end
of the tongue is clamped onto a smooth flat surface and using a round
metal bar about 1/2 inch in diameter, the bar is rolled from near the
clamped end toward the free end. This is repeated until the end of the
tongue is raised 1/32 to 1/16 inch above the surface. If the gap at the
end of the tongue when installed is too small the trumpet will be too
quiet. If the gap is too large the pipe will never speak.
If the builder is a fairly skilled metal worker he could make his own
shallots and tongues. The dimensions originally used by Wurlitzer are
given in the plans. However, since I consider myself more of a wood
worker than metal worker I opted to purchase them from a company which
supplies materials and parts for the organ industry. They also furnished
the tuning wires. These have the hook formed at the end which fits
against the tongue and are straight at the other end. After the wire is
inserted up through the hole in the block a 90 degree bend is put into
the upper end to give the person tuning the pipe something to grip. The
shallots should be polished before installing. This was done by placing
a sheet of very fine sandpaper on a smooth surface such as a drill press
table and rubbing the flat area on the side of the shallot with the
opening until it is smooth and shiny. The tongues as furnished by the
supplier are perfectly flat and so must be given a slight curve. One end
of the tongue is clamped onto a smooth flat surface and using a round
metal bar about 1/2 inch in diameter, the bar is rolled from near the
clamped end toward the free end. This is repeated until the end of the
tongue is raised 1/32 to 1/16 inch above the surface. If the gap at the
end of the tongue when installed is too small the trumpet will be too
quiet. If the gap is too large the pipe will never speak.
I used a small wood-turning lathe to turn the boots, blocks, and pipe feet. A forstner drill bit was used to hollow out the boot. Another small foot was made which is fitted to the bottom of the resonator and which fits into the hole in the block above the reed assembly.
 In addition to tuning the reed with the tuning wire, the resonator must
be cut to the proper length. All the resonators should initially be made
an inch or so longer than the specified length. The wind pressure is
adjusted to the specified value and then the tuning wire is adjusted
until the pipe sounds the correct pitch. However, if the resonator is
too far from being the correct resonant length, the pipe may not speak at
all, or may fly off to some other pitch before the reed reaches the
correct pitch. In this case, a little is trimmed from the large end of
the resonator. All of the resonators have basically the same angle of
taper, so a jig should be made to hold the resonator while it is being
run through the saw. The resonator is trimmed in small increments and
tested again after each cut. In the plans it is recommended that the
resonator be shortened until laying two fingers over the open end no
longer causes the tone to fly off, or change pitch. I tried another
method which I believe is a reliable indicator of resonance. Based on my
training in electronics and years of being a ham radio operator it seemed
to me that the resonator could be tuned in the same way that a dipole
antenna is tuned to resonance. If one considers the reed assembly to be
the transmitter and the resonator to be akin to an antenna, then with the
resonator in place once would tune the reed to the pitch that gave the
fullest, strongest tone. That would be the pitch at which the resonator
is resonant. The pitch is then determined and it will likely be lower
than the desired pitch due to the resonator still being too long. The
resonator would be trimmed by a small amount and the procedure repeated.
This time the pitch should have moved closer to the desired pitch. This
would be repeated until a good strong tone is achieved at the desired
pitch. I believe that this method gives one a better idea of how close
he is getting to the resonant length.
In addition to tuning the reed with the tuning wire, the resonator must
be cut to the proper length. All the resonators should initially be made
an inch or so longer than the specified length. The wind pressure is
adjusted to the specified value and then the tuning wire is adjusted
until the pipe sounds the correct pitch. However, if the resonator is
too far from being the correct resonant length, the pipe may not speak at
all, or may fly off to some other pitch before the reed reaches the
correct pitch. In this case, a little is trimmed from the large end of
the resonator. All of the resonators have basically the same angle of
taper, so a jig should be made to hold the resonator while it is being
run through the saw. The resonator is trimmed in small increments and
tested again after each cut. In the plans it is recommended that the
resonator be shortened until laying two fingers over the open end no
longer causes the tone to fly off, or change pitch. I tried another
method which I believe is a reliable indicator of resonance. Based on my
training in electronics and years of being a ham radio operator it seemed
to me that the resonator could be tuned in the same way that a dipole
antenna is tuned to resonance. If one considers the reed assembly to be
the transmitter and the resonator to be akin to an antenna, then with the
resonator in place once would tune the reed to the pitch that gave the
fullest, strongest tone. That would be the pitch at which the resonator
is resonant. The pitch is then determined and it will likely be lower
than the desired pitch due to the resonator still being too long. The
resonator would be trimmed by a small amount and the procedure repeated.
This time the pitch should have moved closer to the desired pitch. This
would be repeated until a good strong tone is achieved at the desired
pitch. I believe that this method gives one a better idea of how close
he is getting to the resonant length.
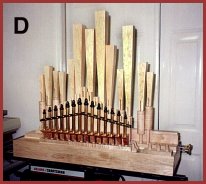
Tuning the trumpets takes a little more time than the other pipes in the organ. One other caution. You might be tempted to try a trumpet pipe by blowing into the foot. This is not recommended. The high moisture content of your breath is not beneficial to the metal parts. Finally, a view of the trumpet pipes installed in the wind chest can be seen in PHOTO D. In this photograph the piccolos are in the front row, the flageolets in the second, and the trumpets behind that.
Editors note: Howard is a retired electrical engineer and lives in Florida. Most of his career was at the Army Night Vision and Electro-Optics Laboratory. He became involved in mechanical music with the purchase of a non-working player piano. As you will see in his articles, Howard is a highly skilled craftsman. Building your own band organ is a real accomplishment and Howard does beautiful work. Howard can be contacted at: hwyman@tampabay.rr.com