by Howard Wyman
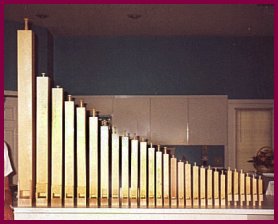
At the outset of this project I constructed a few flute pipes and when I gained some confidence in my ability to build pipes I moved on to the flageolets, piccolos, and trumpets. Now I decided it was time to finish up the remaining flutes. A large number of the 97 pipes in the organ are stopped flutes, 28 to be exact. In large pipe organs such as church and theater organs there is usually a stop called the diapason. This is a rank of pipes which encompasses the full range of the organ. In the Wurlitzer 105 the stopped flutes could almost be called the diapason since they range from the lowest note in the bass to the highest note in the melody. All 28 stopped flutes are shown in the Photo . At the left is the bass G pipe followed by the other four bass pipes. The next nine pipes are the accompaniment flutes and to the right of that are the 14 melody flutes. One can see in the picture that the six pipes on the far right have feet for insertion into the top of the windchest. The other 22 pipes will be mounted underneath the floor of the organ and so the openings for the air to enter are at the bottom rear of the pipes. I should also point out that some of these pipes are too long to fit inside the case as they are shown. The five bass pipes and the longest accompaniment pipe will have to be mitered to fit into the organ. According to organ builders with more experience than me, closed pipes such as these can have a 90 degree miter without affecting the tone. However an open pipe should be mitered with two 45 degree bends. In order to miter a pipe with a 90 degree bend one cuts the pipe through at a 45 degree angle then by rotating the upper section of the pipe 180 degrees, it should fit together with the upper part at a 90 degree angle to the lower part. The length of the pipe at the longitudinal centerline is still the same so if the pipe was tuned to the proper pitch before mitering it should still be very close to the correct pitch. In order to make the miter joint stronger I cut slots in the edges of the front and back boards where they were to be glued together and glued thin splines into these slots.
 The actual construction of the flutes is similar to the method I
described for the flageolets in Part 3 of this series. You can refer to
Part 3 by looking in the ROUND N ROUND Archives. The differences are
that the flageolets are open pipes with a tuning slide whereas the flutes
are closed pipes and are tuned by a move able plug at the end of the
pipe. Also, the chamfer on the flageolets extends completely across the
face whereas the chamfer on the flutes is only as wide as the inside
width of the pipe. When making the maple piece from which the block
will be cut it should be long enough for the block plus a tuning stopper.
Also allow enough to make a couple of spacers to hold the proper
dimensions as the pipe is being glued together. Assembling the pipe
walls to the block is performed in the same manner as described in Part 3
should be formed. There are probably several ways this could be done,
here is the method I finally settled on. With a pencil mark the top and
bottom of the chamfer across the face. Turn the board over and mark the
bottom of the chamfer on that side of the board also. Using a sharp
knife cut across the board along this line. This groove will give a
clean edge to the bottom of the chamfer as the material is cut away.
Next, on the edges of the board draw a line from the upper edge of the
chamfer at the front of the board to the lower edge of the chamfer on the
rear of the board. This will give you the angle of the chamfer. Now
clamp the board face-up in a drill press vise. The marks on the edge of
the board can be aligned with the top edge of the jaws of the vise.
The actual construction of the flutes is similar to the method I
described for the flageolets in Part 3 of this series. You can refer to
Part 3 by looking in the ROUND N ROUND Archives. The differences are
that the flageolets are open pipes with a tuning slide whereas the flutes
are closed pipes and are tuned by a move able plug at the end of the
pipe. Also, the chamfer on the flageolets extends completely across the
face whereas the chamfer on the flutes is only as wide as the inside
width of the pipe. When making the maple piece from which the block
will be cut it should be long enough for the block plus a tuning stopper.
Also allow enough to make a couple of spacers to hold the proper
dimensions as the pipe is being glued together. Assembling the pipe
walls to the block is performed in the same manner as described in Part 3
should be formed. There are probably several ways this could be done,
here is the method I finally settled on. With a pencil mark the top and
bottom of the chamfer across the face. Turn the board over and mark the
bottom of the chamfer on that side of the board also. Using a sharp
knife cut across the board along this line. This groove will give a
clean edge to the bottom of the chamfer as the material is cut away.
Next, on the edges of the board draw a line from the upper edge of the
chamfer at the front of the board to the lower edge of the chamfer on the
rear of the board. This will give you the angle of the chamfer. Now
clamp the board face-up in a drill press vise. The marks on the edge of
the board can be aligned with the top edge of the jaws of the vise.
This puts the board at the correct angle to form the chamfer. Use a 1/4 inch router bit in the chuck of the drill press and set the speed at the highest setting for your drill press. Material can then be cut away by sliding the vise across the drill press table. Since the speed is less than the typical router only shallow cuts can be made so it will take several passes. As I mentioned earlier the chamfer on the flageolets extends across the full width of the face of the pipe, however for the made up a wooden jig for the drill press table which has a fixed fence on one side and an adjustable fence on the other. The jig is fastened down to the table so that the stationary fence limits the sideways travel of the vise to determine where one side of the chamfer will be and then the adjustable fence is set to the point which will determine the other side of the chamfer.
After the chamfer and cut up are formed the front can be glued onto the pipe. Next the windway is formed by filing the front of the block at approximately the same angle as the chamfer. Periodically lay the cap on the front and measure the windway with a feeler gauge.
The next step is to make the tuning plug. The plug is covered on the bottom and sides with a suede type of leather in order to make an airtight seal. The wooden piece for the block must be trimmed so that after the leather is glued on it fits snugly into the pipe. However, it must not be so tight that it cannot be moved up and down to tune the pipe to the correct pitch. For the handles for the tuning plugs I used the ready made pieces called shaker pegs which are available at most craft stores. I was able to find these in three sizes and in the photograph you can see the largest protruding from the top of the large bass G on the left and the smallest on the melody flutes at the far right.
Finally the caps are glued onto the face of the blocks. Before actually gluing the cap on, set the air pressure to the correct level and move the cap up and down slightly to find the best tone. Mark that spot and glue or screw the cap in place.
Next month I will discuss the construction of the violin and cello pipes and that will complete the pipe work.
Editors note: Howard is a retired electrical engineer and lives in Florida. Most of his career was at the Army Night Vision and Electro-Optics Laboratory. He became involved in mechanical music with the purchase of a non-working player piano. As you will see in his articles, Howard is a highly skilled craftsman. Building your own band organ is a real accomplishment and Howard does beautiful work. Howard can be contacted at: hwyman@tampabay.rr.com